How to Create a New Pattern in Fl Studio
FL Studio 20 is a great DAW and now Mac owners get a chance to enjoy its fun. That means a lot more people are being tempted to take the Fruity route. Our guide for anyone new to FL continues with a look at working with Patterns in FL Studio 20 and how they can add some speedy variation to your track. Read part 1 here.
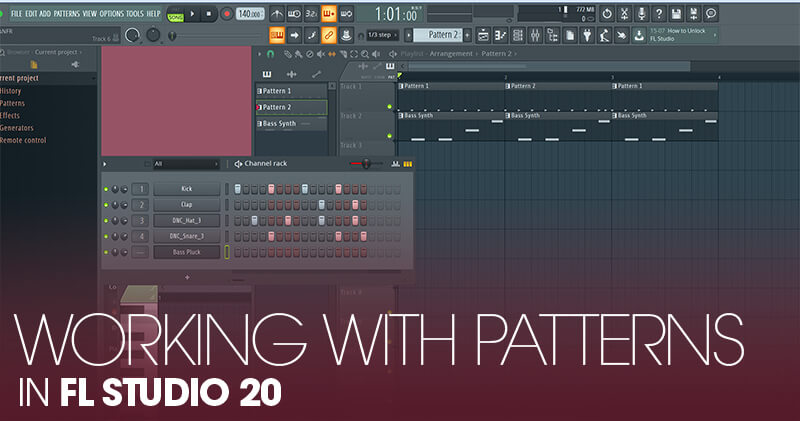
We recently reviewed the latest version 20 of FL Studio and started this series of tutorials especially for newcomers to the software. We are assuming that you have used other DAWs before (although that is not essential) so the idea of these tutorials is to show you how FL Studio may do things differently – but still simply – compared to ways you might be used to in other DAWs.
In Part 1 we introduced the five main areas within FL Studio – the Browser (for your samples, sounds, instruments, effects and so on); the Channel Rack (with Patterns for beats and notes); the Playlist (where the song arrangement comes together); the Piano Roll editor; and finally the Mixer.
This time around we're going to look at two of these areas – namely the Patterns and Piano Roll editor – in more depth. Understanding just these two elements will give you that 'Eureka' moment, as you'll realise that these are the core of the program. You create complete tunes with this Pattern approach but, within it, the Piano Roll editor offers a familiar recording and editing environment for 'traditional' DAW users.
Patterns to roll
Open up FL Studio and you'll be faced with an empty Pattern complete with four drum sounds, so we'll launch straight into that and create a simple 4/4 drum pattern over four bars. The advantage of using Patterns is quickly realised when using the Clone option from FL Studio's many features.
It allows you to quickly build up a library of different patterns simply by duplicating existing ones and then editing them for some variation. Many traditional DAW owners will be acutely aware that looping beats is the scourge of modern music production, but this pattern-based approach allows you to quickly and easily introduce some much-needed variation.
It's also very fast and easy to change the core sounds at your disposal, so we'll quickly run through how to either replace a sound or edit the existing one with the many effects on offer in FL Studio 20. After perfecting our sounds and beats, we move onto adding a synth bass. Again, you could simply use the step sequencer to fill notes in but a more flexible approach brings in the Piano Roll editor that allows you to record in notes either by drawing or playing them in.
Now we have a bass and two beat parts we can start arranging and here it's a case of dragging each Pattern onto the Playlist area. As a traditional DAW user, you might want to keep the beats on one 'track' and the bass on another, but you don't have to. As we show, moving the bass onto the same track as the beats makes no difference as each Pattern will play the same thing no matter where you put it on the Playlist.
Next time we'll finish our simple tune and start going in depth with more FL Studio 20 features. Join us for part 3 then, and in the meantime check out our review of FL Studio 20 here.
Working with Patterns in FL Studio 20: step-by-step
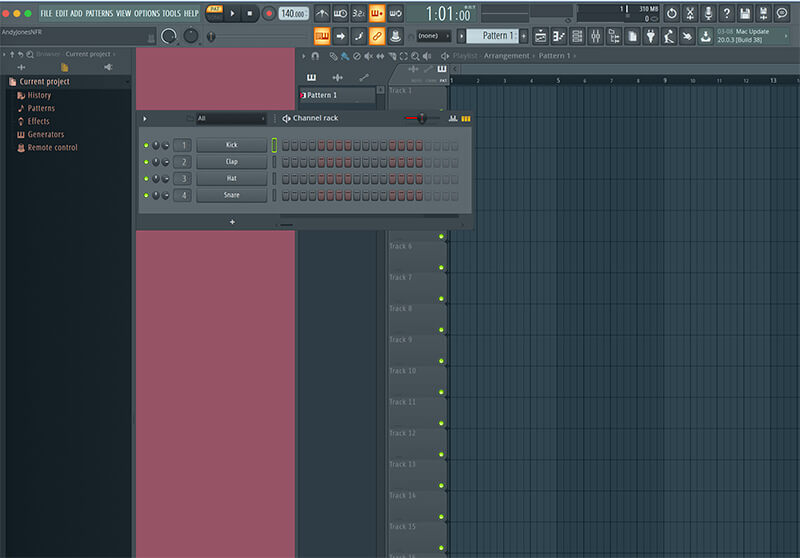
1. Open FL Studio for the first time with a blank project and you'll be faced with this. We explained each of the areas last time around but for now we're going to concentrate on creating Patterns using the Channel Rack. Luckily there's one already set up to make beats with…
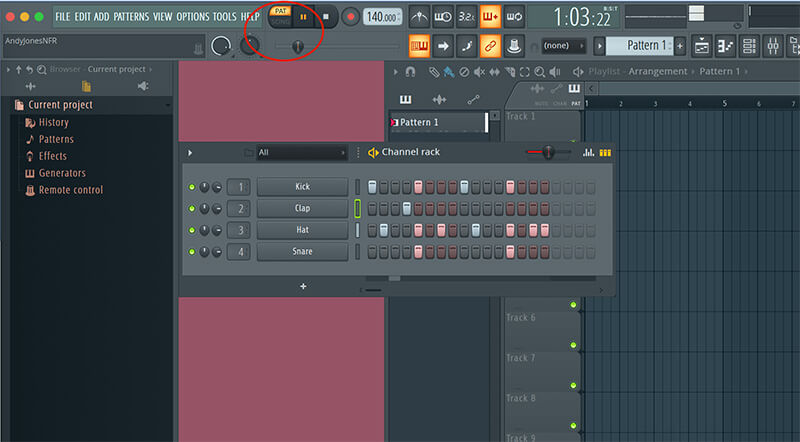
2. You get four sounds – kick, clap, hay and snare – four bars of each, with four beats per bar. Creating a Pattern is simply a matter of clicking on a beat. To play it back, make sure the Pat icon is on (highlighted) and hit Play to hear your beats. To delete a beat click with Control or right click.
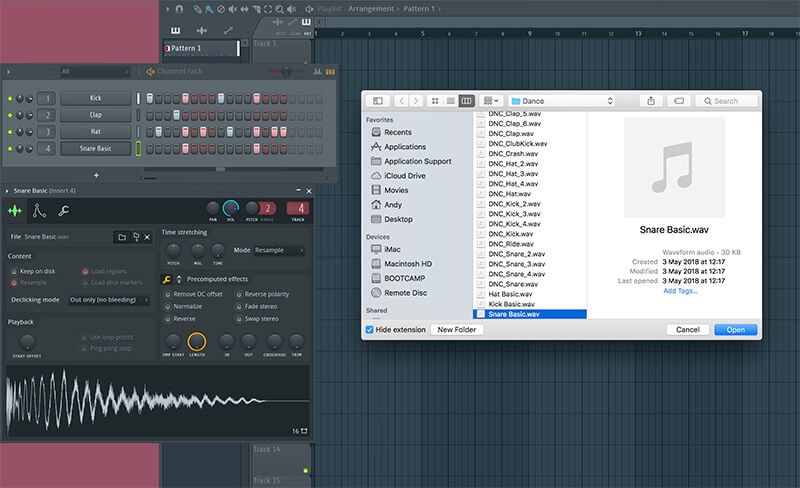
3. If you want to change any of the sounds – and they are pretty basic to start with – click the part you don't like. Then under the File section of the window that pops up, click the folder icon. This will take you to individual samples supplied for FL Studio or you can select your own audio to load.
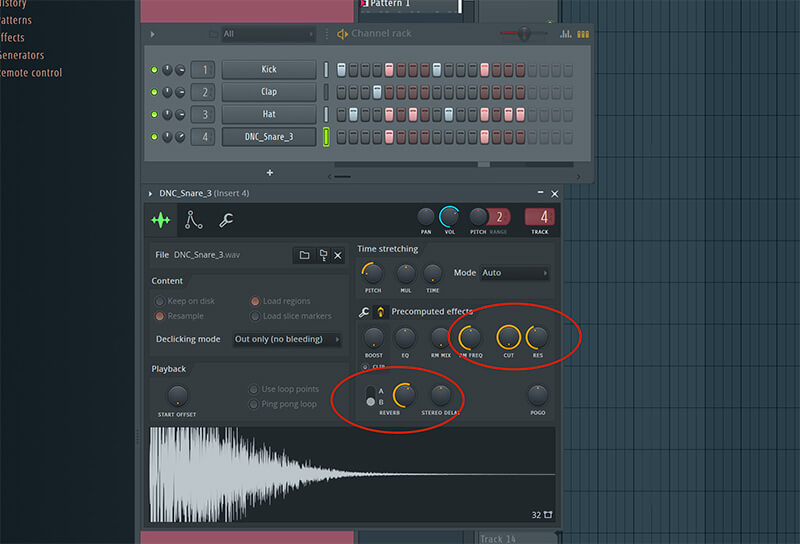
4. Alternatively you can change the preloaded sounds very dramatically by employing some of the pitch, filter and other effects. Here we've boosted the filter resonance and added a touch of reverb to our snare sound, for example.
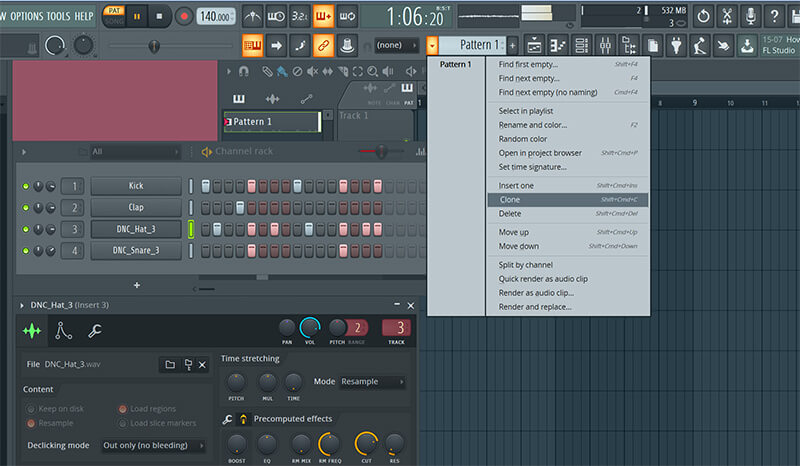
5. So you have one Pattern of beats with the sounds you are happy with. Here's how to make quick variations of that Pattern. Control/right-click the Pattern window option and select Clone from the drop-down menu. This opens a new Pattern 2 with identical beats.
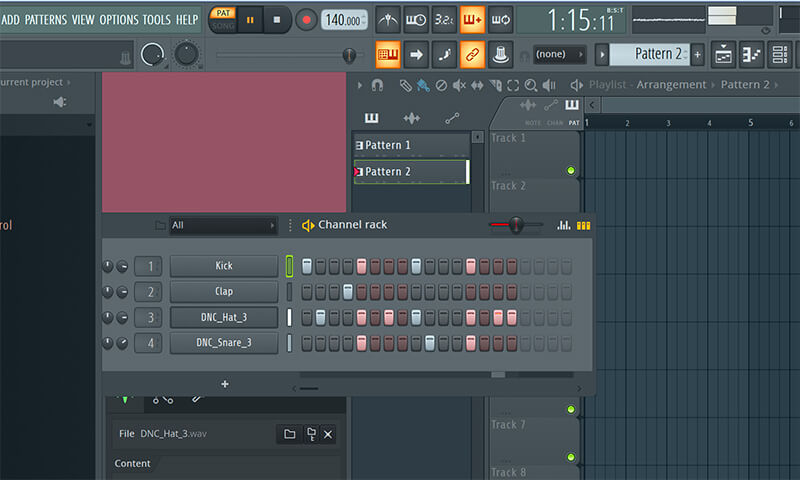
6. Make some variations of the beats in the new Pattern 2. Now you can simply click on each Pattern to change from one to the other on playback. You can do this as many times as you like, simply by selecting the Clone option, so rinse and repeat!
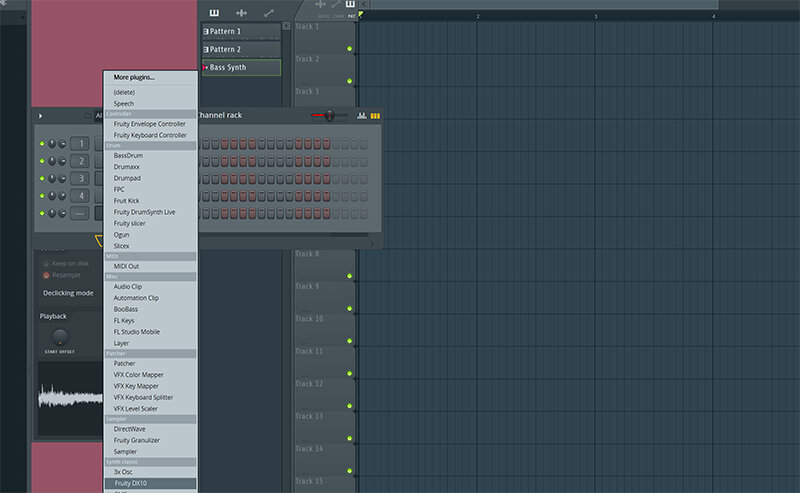
7. Now we're going to add a bass sound. Create a new Pattern by clicking the + icon to the right of the pattern window. Name it (Bass Synth). Then within the new Rack hit the + icon at the bottom which gives you a list of available instruments to choose from. We've chosen the Fruity DX synth.
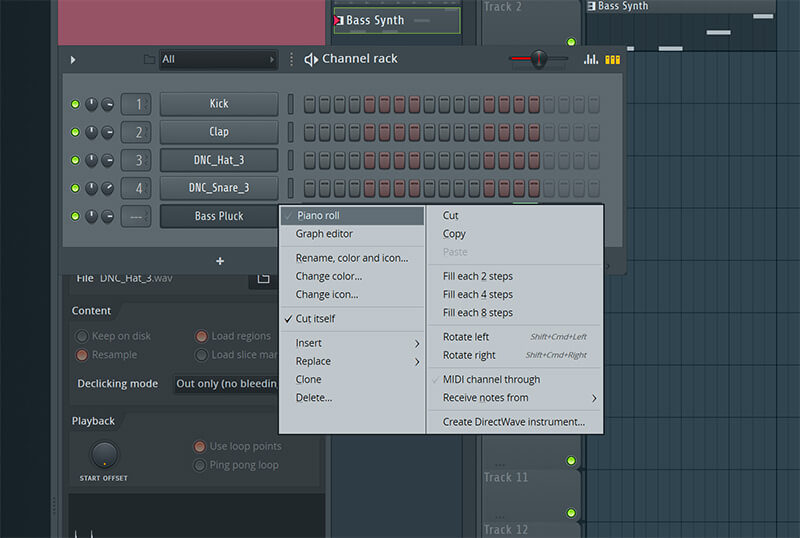
8. Now you can draw notes in as you did beats, but the problem here is that it will just be the same note each time, so you'll need to work within the Piano Roll editor to create a melody. Control/right-click the Bass part to get a drop down menu and select Piano Roll.
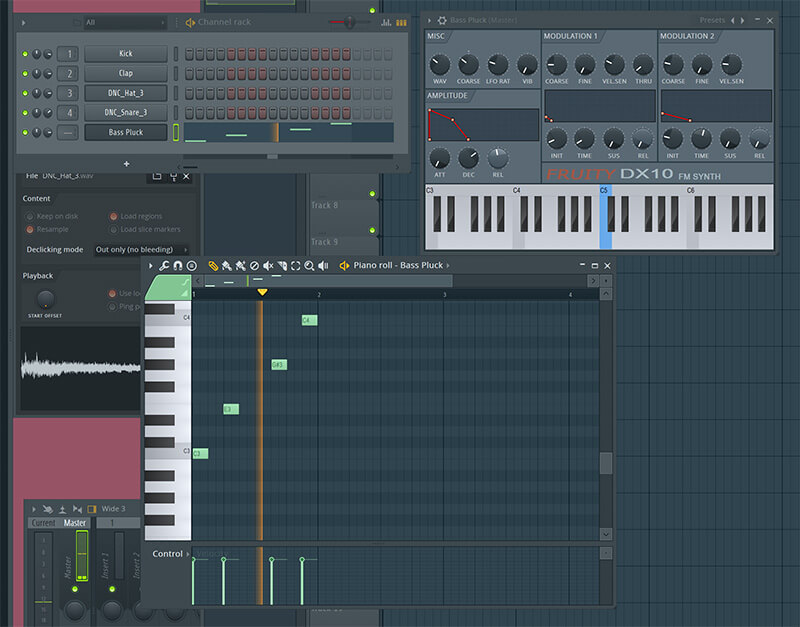
9. Now you get access to the entire keyboard of notes to play. You can draw notes in or record them live via a MIDI keyboard. Notes can easily be moved, deleted, lengthened or shortened.
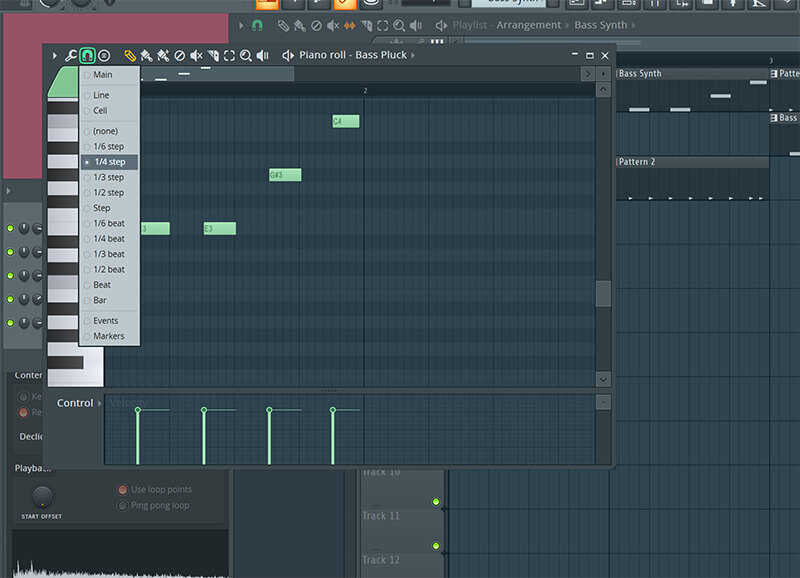
10. You can also choose the snap value from the drop down 'magnet' icon, so your notes can be tied and quantised to certain levels for extra accurate playing and editing.
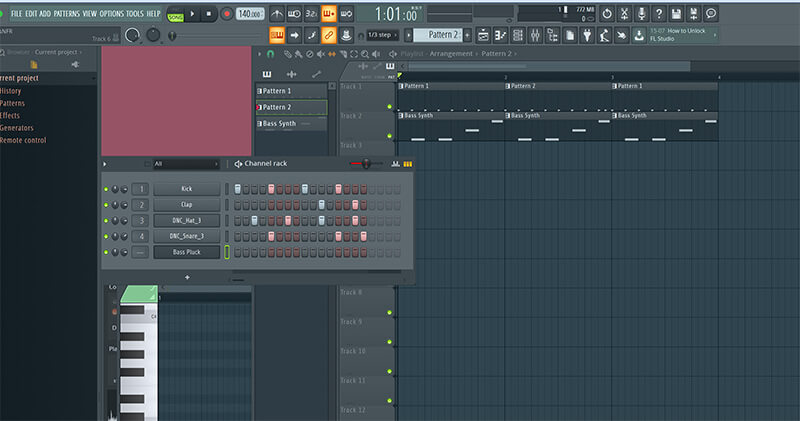
11. Now we're going to arrange the three Patterns we've created. You simply drag each onto the Playlist. Clicking will paste a new one of the Pattern selected and control/right-clicking will delete it. In this way you can very quickly build up an (albeit simple) song.
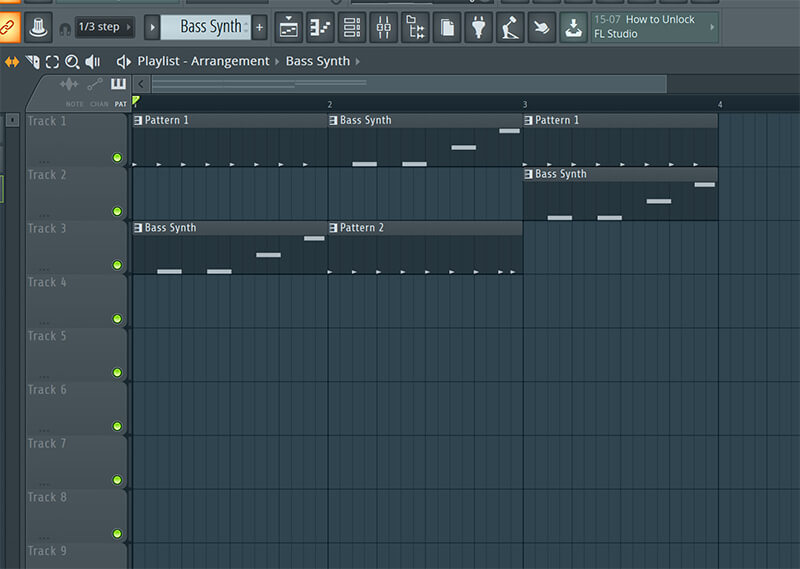
12. In the previous step we had the beats on Track 1 and the bass on Track 2 – as you might have done in any other DAW. But here, the Patterns are pockets of their own sonic data so can be moved anywhere you like. So here we have beats and bass all on Track 1. How cool is that?
Check out previous entries in our FL tutorial series here
How to Create a New Pattern in Fl Studio
Source: https://musictech.com/tutorials/working-with-patterns-in-fl-studio-20/
0 Response to "How to Create a New Pattern in Fl Studio"
Post a Comment