Can't Draw Arc Autocad

Arc command | How to use Arc command in AutoCAD full A to Z tutorial with pictures | Learn free AutoCAD only in www.autocadprojects.com
Hey Guys,
Previously we have learned How to use the circle command.
Now we will know about how to use the Arc command in the AutoCAD.
So, let's get started.
About Arc command in Autocad
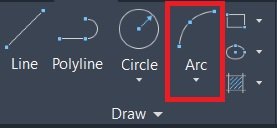
1) In AutoCAD, the Arc command is used to draw arcs. Arc command can be found from the Arc tool available in the draw panel in the Home tab.
2) Also can be invoked arc command by type 'Arc' or 'A' in the command bar.
3) AutoCAD has many methods to draw Arcs. By using these methods as needed, we can draw arcs very easily and in a short time.
How many types of arcs are there in AutoCAD?
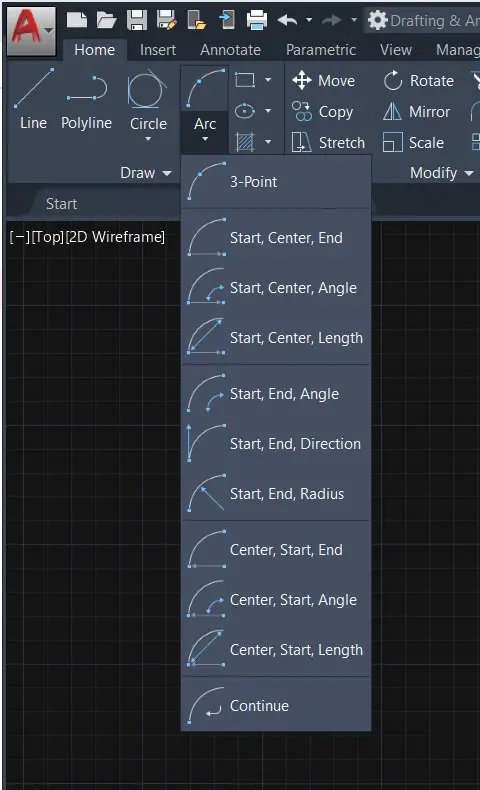
In AutoCAD, we can create arcs in eleven different ways. There are eleven different options are available and used based on the geometry conditions of the design.
To create an arc, we can specify various combinations of endpoint, start point, center points, radius, angle of arc, chord length, and direction values.3-point
1) 3-point
2) Start, Center, End
3) Start, Center, Angle
4) Start, Center, Length (Chord Length)
5) Start, End, Angle
6) Start, End, Direction
7) Start, End, Radius
8) Center, Start, End
9) Center, Start, Angle
10) Center, Start, Length (Chord Length)
11) Continue Arc command
There are eleven options are available to draw arcs very easily. We will discuss each method in brief.
How do you draw an arc in AutoCAD?
1) 3- Point Arc command

1) Let's start with the 3-point method, which is by default the selected option in AutoCAD.
2) Simply select a 3-point option from the Arc dropdown menu from the draw panel in the Home tab.
3) Take three points from where you want to draw an arc. Specify the first point of the arc.
4) then specify the second point of the arc.
5) Specify the endpoint of the arc. We can specify these three points in a clockwise or anticlockwise direction as needed.
Mostly this method is useful while sketching geometry.
2) Start, Center, End Arc command
1) In this method, we can start to draw an arc by mainly using the starting and center point, and when starting and the center point is known and the endpoint has to adjust.
2) Select the "Start, Center, End" option from the Arc dropdown menu from the draw panel in the Home tab.
3) Specify the starting point of the arc. Choose the start point as we can draw the arc in an anti-clockwise direction.
4) then specify the second point of arc or give any dimension of the radius or center point which you want. The length between the first points to a center point defines the radius of the arc.
5) Specify the endpoint of the arc.
6) Specification of point in a counter-clockwise direction will show arc in the opposite direction. Or by press control key will show arc in the opposite direction automatically.
Example of the draw this type of arc is drawing the door in a plan.
3) Start, Center, Angle Arc command
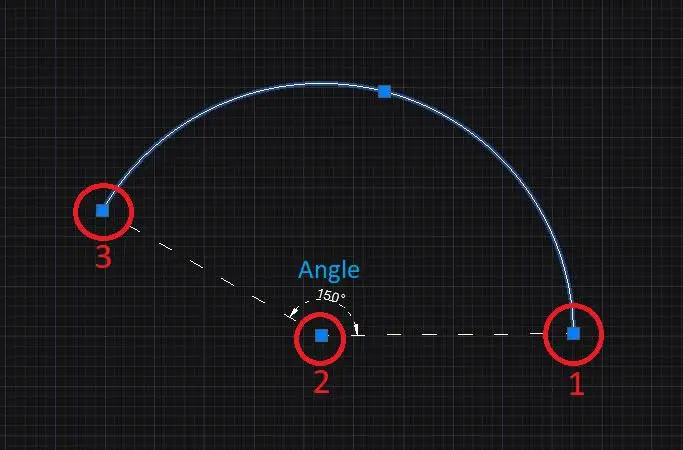
1) The process of this method is the same as the previous method. In the previous method, we could specify the third point ourselves by the known third point, but in this method, the third point can be specified by giving an angle.
2) Select the "Start, Center, Angle" option from the Arc dropdown menu from the draw panel in the Home tab.
3) Specify starting point of the arc.
4) then specify the second point of arc or give any dimension of the radius or center point which you want. The length between the first points to a center point defines the radius of the arc.
5) The third can be specified by clicking on one point by selecting any angle or by giving any angle like, 30, 60, 180, etc which you want.
4) Start, Center, Length (Chord Length)
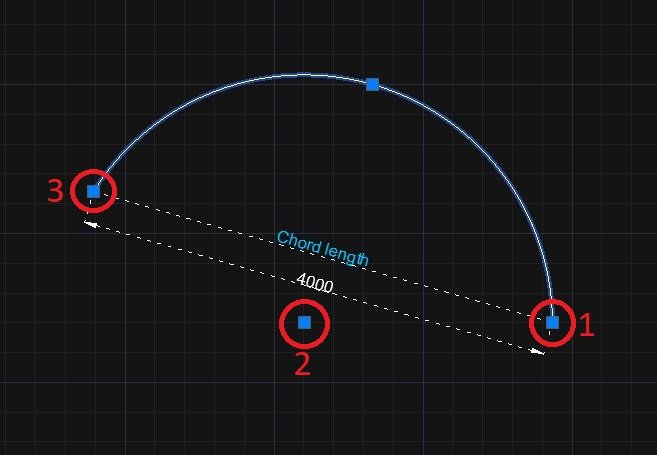
1) The process of this method is the same as the previous two methods. But in this method, we have to specify the third point by giving the chord length of the arc which is the length between the first and last points of the arc.
2) Select the "Start, Center, Length" option from the Arc dropdown menu from the draw panel in the Home tab.
3) Specify the starting point of the arc.
4) then specify the second point of arc or give any dimension of the radius or center point which you want.
5) The length between the first point to a center point defines the radius of the arc the same as previous methods.
6) The third point can be specified by giving the chord length of the arc.
5) Start, End, Angle Arc command
1) This method is different from all previous methods.
2) In this method, we can start to draw an arc by mainly using the starting and ending point and when the starting and ending point is known as the center point have to adjust.
3) Select the "Start, End, Angle" option from the Arc dropdown menu from the draw panel in the Home tab.
4) Specify the starting point of the arc.
5) then specify the second point which will be the endpoint of the arc.
6) Specify the third point which is a center point by adjusting the angle or giving the angle which you want.
7) Press the control key to change the direction of the arc.
This type of arcs is using in sketching geometry.
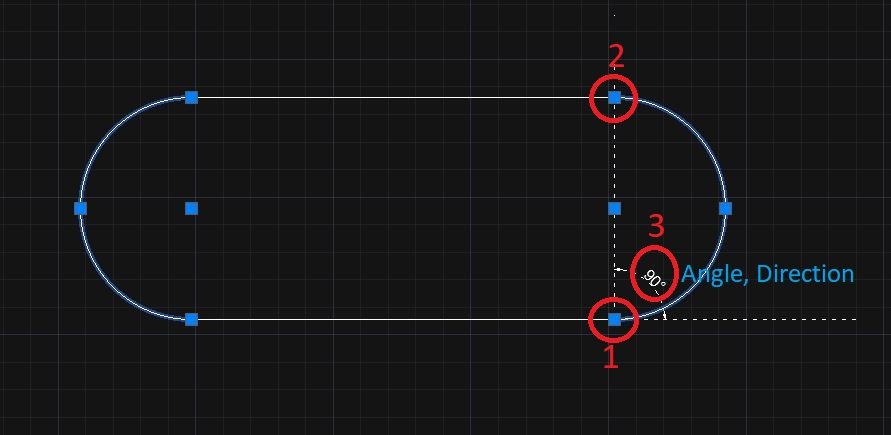
6) Start, End, Direction
1) The process of this method is the same as the previous method. But in the previous method, we could give an angle only in one direction, whereas in this method we can give an angle in any direction in which you want.
2) Select the "Start, End, Direction" option from the Arc dropdown menu from the draw panel in the Home tab.
3) Specify the starting point of the arc.
4) then specify the second point which will be the endpoint of the arc.
5) Specify the third point which is the center point by adjusting the angle or giving the angle which you want the same as the previous method.
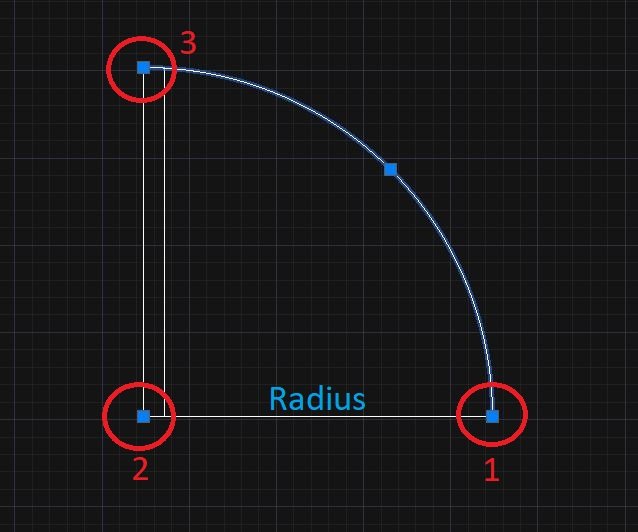
7) Start, End, Radius Arc command
1) The process of this method is the same as the previous two methods. But in this method, we need to give radius length rather than angle for specific the center point.
2) Select the "Start, End, Radius" option from the Arc dropdown menu from the draw panel in the Home tab.
3) Specify the starting point of the arc.
4) then specify the second point which will be the endpoint of the arc.
5) Specify the center point by giving the radius of the arc circle.
6) Press the control key to change the direction of the arc.
8) Center, Start, End Arc command
1) This method is the same as "Start, Center, End", but the order is different. In this method, we have to start an arc with the center.
2) Select the "Center, Start, End" option from the Arc dropdown menu from the draw panel in the Home tab.
3) First, specify a center point in this method.
4) then specify the second point of arc or give any dimension of the radius or as a starting point of the arc which you want. The length between the center point to the starting point defines the radius of the arc.
5) At last, specify the endpoint of the arc.
6) Specification of point in a counter-clockwise direction will show arc in the opposite direction. Or by press control key will show arc in the opposite direction automatically.
9) Center, Start, Angle Arc command
1) This method is the same as "Start, Center, Angle", but the order is different. In this method, we have to start an arc with the center.
2) Select the "Center, Start, End" option from the Arc dropdown menu from the draw panel in the Home tab.
3) First, specify a center point in this method.
4) then specify the second point of the arc or give any dimension of the radius or Start point of the arc which you want. The length between the center point to the starting point defines the radius of the arc.
5) The third can be specified by clicking on one point by selecting any angle or by giving any angle like, 30, 60, 180, etc which you want.
10) Center, Start, Length (Cord length)
1) This method is the same as "Start, Center, Length", but the order is different. In this method, we have to start an arc with the center.
2) Select the "Center, Start, End" option from the Arc dropdown menu from the draw panel in the Home tab.
3) First, specify a center point in this method.
4) then specify the second point of arc or give any dimension of radius or starting point of an arc that you want.
5) The length between the center point to the starting point defines the radius of the arc the same as previous methods.
The third point can be specified by giving the chord length of the arc.
11) Continue Arc command

1) This method is different from all methods. By repeating this method, we can continue drawing an arc from the endpoint of the previous arc. The process is the same as the "3-point" method.
2) Select the "Continue" option from the Arc dropdown menu from the draw panel in the Home tab.
3) Specify the starting point of the arc.
4) then specify the second or center point of the arc. Distance between the starting point to a center point defines the radius of the arc circle.
5) Last, the select endpoint of as same as the "3-point" method.
6) By selecting or repeat again these "continue" options we can continue our new arc from an endpoint of the previous arc.
7) Press the control key to change the direction of the arc.
Know about arc command in AutoCAD from our Youtube channel.
People Asks questions about arc command:
1) What is the ARC command in AutoCAD?
The Arc command in AutoCAD creates the arc. There are many meanings for the word "arc" in mathematics.
In general, an arc is called any smooth curve joining two points.
Or we can say that Arc is the one part of any circle.
2) What is a 3 point arc?
The first method to draw an arc is 3 point method. In 3 points, the first point specifies the starting of the arc, the second point can be specified anywhere on the arc, and the third point specifies the ending of the arc.
We can draw an arc in a clockwise or anticlockwise direction depending on the points you pick.
Also, Read Our Previous Article
Thank you for visiting here…
Source: https://autocadprojects.com/arc-command/
0 Response to "Can't Draw Arc Autocad"
Post a Comment